This is a guide to Blue Archive’s PvP made by Causew#5130 for the community.
If you’re interested in more Blue Archive content, we have a Blue Archive Tier List guide that rates every unit in the game. You might also be interested in our Blue Archive Coupon Codes page for free pyroxenes to spend!
“Where’s my tier list?”
There is no good tier list for PvP. Yes, some units are stronger than others, but there is a counter pick to every single unit in this game. There is no possible way to faithfully rank each character in Blue Archive on a single catch-all list. This goes for all game modes, not just PvP. Take any tier list you see for Blue Archive with chunks of salt.
“I want my tier list dammit”
Ugh, fine. But you’re going to get 3 small tier lists. 1 for each type of terrain because the meta can change drastically between each season. I’m also not going to include the dark horse or anti-meta picks because – I repeat – there is no way to faithfully rank these characters on a single list. If a unit is not on the list it does not mean they are unusable – they are just un-rankable. If you decide to read the rest of this doc, you will find these tier lists are simply a TL;DR summary of the contents.
Do not take these tier lists out of context. They are completely worthless on their own. At least link the whole doc if you plan to share this.
URBAN PVP TIER LIST
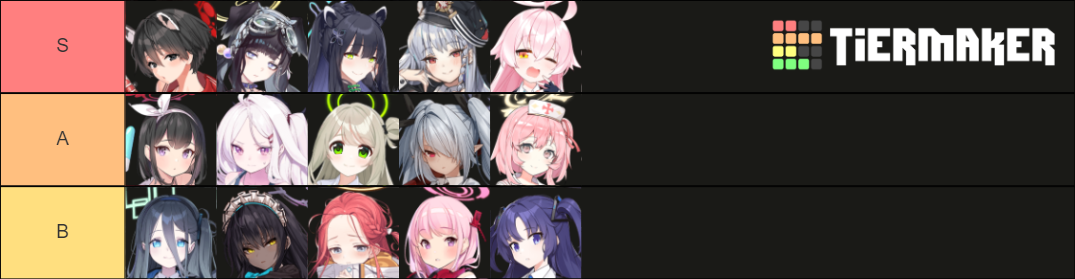
OUTDOORS PVP TIER LIST
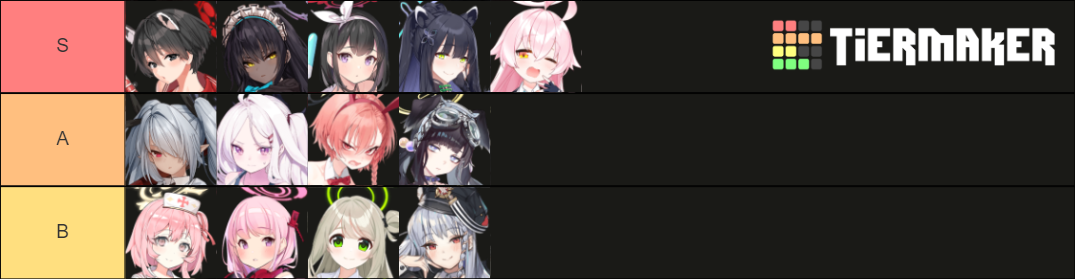
INDOORS TIER LIST
(not out yet)
With all that said, this guide aims to teach less experienced players about the various types of decision-making you can take to improve your PvP experience. I attempt to explore all aspects of Blue Archive’s PvP in a digestible manner without pages upon pages of fine detail. I maintain this doc regularly, so sometimes you might experience pages moving up and down as I edit it. Please excuse me when this happens.
If you are a top ranker in one of JP’s busiest brackets, then this guide won’t help you.
Thank you to all the regulars of #jp-pvp in BA’s community discord for months upon months of PvP discussion, fact-checking, and memes.
Link to said discord: https://discord.gg/bluearchive
If you have any PvP questions then feel free to direct them to #jp-pvp.
Contact Causew#5130 or /u/VirtualScepter for any doc related feedback.
Introduction
What is PvP in Blue Archive?
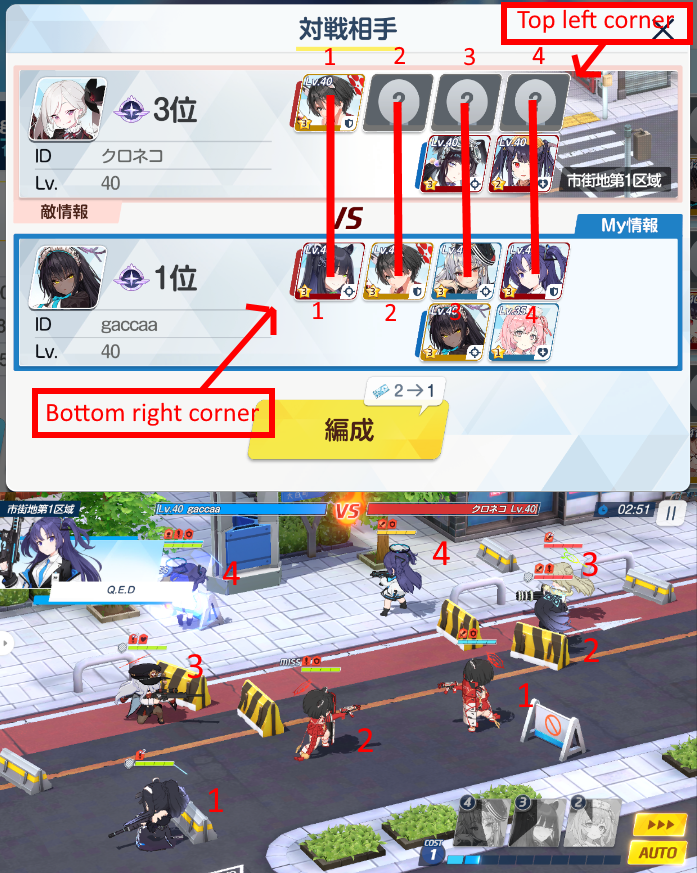
The concept of BA’s PvP is fairly simple. You form a team as you normally would in other game modes, and then you send them to attack another player’s defending team. If an attacker wins against a defender with a higher rank, the attacker and defender swap ranks.
As an attacker, you get 5 free attempts every day to attack someone for a chance to climb the ladder. You can choose to do these attacks whenever you like, and you can swap the teams however you want as you see fit. You are also allowed to be picky (to an extent) about your defending opponent.
You can also choose to purchase more attack attempts – but this is intentionally more expensive than any marginal reward you can get from PvP and is definitely not recommended. These purchases are for people who enjoy climbing ladders – they will not optimise your rewards.
As a defender, you set yourself a defending team to protect your rank… and that’s it. There is no limit to how many times you can be attacked, meaning you may see 0 defends one day and 9 defends the next. You can change your defending team at any time, but there are no replays of the battles to help you adjust your defending strategy. The only information you have access to as a defender are damage graphs.
In the middle of a battle, your units are controlled by the AUTOPLAY AI rather than yourself. A battle is over after one team’s strikers have all been eliminated, or the timer runs out. If the battle times out then the team with the most remaining HP wins.
Are there rewards?
PvP has rewards in 3 forms: Credits, Pyroxenes (Gems), and Coins. These rewards are handed out in different manners:
- Per battle
- An attack win rewards 1000 credits
- A defence win rewards 3 coins
- Minutely
- You passively generate credits based on your PvP rank. This ranges from 30creds/min at the absolute lowest rank, and 120creds/min at rank 1
- Daily
- Everyday you can claim a daily reward based on your rank. Note that these rewards are based on your current rank from when you click on the claim button, so you should climb as far as you can for the day before claiming
- Claim time is on a different schedule to daily reset
- You can claim up to 45 Pyroxenes and 125 coins every day for first place
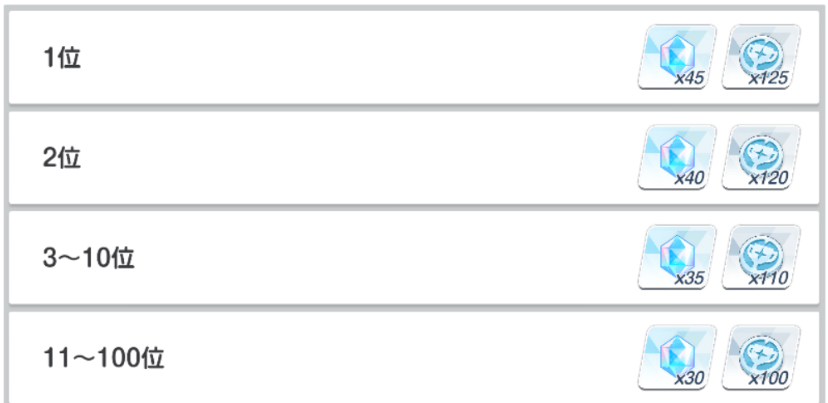
Top 4 tiers of daily pvp rewards. These should be achievable in a new bracket.
- Season highest placement
- You will earn Pyroxenes as you reach rank milestones for the first time in a season. This totals to about 2490 Pyroxenes for reaching rank 1
- As the name implies, you can re-earn this every time PvP is reset and a new season comes
- Overall highest placement
- You will earn Pyroxenes as you reach rank milestones for the first time. This totals to about 5660 Pyroxenes for reaching rank 1
- These rewards are not ever reset
Coins are spent at the PvP shop, which refreshes every day. You can also spend an additional 10 coins to refresh, up to 3 times a day.

Even if you don’t care about PvP, you should at the very least aim to earn enough coins to be able to buy out 90 AP every day. AP is important for progression, and you’ll be noticeably slower in leveling if you don’t utilise this free AP daily.
Your PvP Bracket
PvP wouldn’t be very rewarding if every player shared the same ladder. Players are separated by brackets, and each bracket has their own leaderboard. These brackets are initially determined by account creation date; so an account made today would probably share a bracket with other accounts made today and tomorrow, but you should not see 1 week old players in your bracket.
Brackets are also reset between seasons. When a season resets, all players are shuffled around to ensure the competition remains active. You are likely to be replaced into a bracket of players with a similar level to yours.
To make the climb possible in a new bracket, the leaderboard is initially filled with bots. Bots are identifiable when:
- Player ID is the same as a student
- Profile pic and the first character of their team are the same unit
- Their team composition makes no sense
Example bot
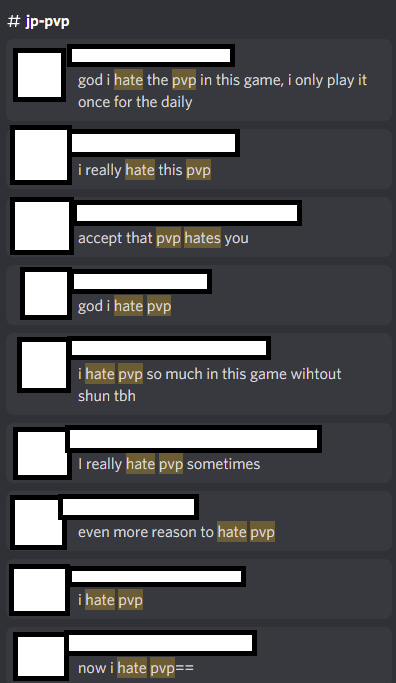
“PvP is too RNG and I never win”
Sure, randomness sucks and not being able to control your units can be a frustrating experience, but there are a couple of factors within your control. These factors matter, and I hope to be able to educate you about how you can use them to influence your win rate and place higher on the ladder. After all, if PvP was purely decided by randomness, then everyone would have a 50/50 win/loss rate, and that is simply not true. In the appendix is an analogy liking BA’s PvP to Trading Card Games.
If you don’t want to participate, that’s fine too as it won’t harm your progression drastically. At the very least you should think about earning enough coins daily to buy the stamina in the shop. Don’t worry, this is a really low bar.
Glossary
Some terms that will appear in this document going forward:
- Pos(X)
- Refers to Position X, with X meaning the slot the character is in on the team building screen. Yes, it matters.
- Number 1-4, left to right
- A(X) or D(X)
- A stands for Attack. D stands for Defence. X refers to Position X.
- For example, A2 will refer to a character in the Attack team on Pos2
- AA
- Auto attack.
- CC
- Crowd Control
- Includes Stuns, Taunts, Fears
How 2 PvP
If you don’t care to learn about the finer details of BA’s PvP, it’s fine for you to skip to the team building section of this doc. While the details in this section may help you increase win rate, knowing which units are good is enough if you’re only here for a quick cash out.
That said, this section will explain in some detail the things you can think about when attempting to improve your win rate.
Positioning and AI behaviour
Games can be won and lost on positioning alone. Unit positioning is a very deep and complicated topic in which you can dedicate a whole document to explaining all kinds of possibilities surrounding where your students decide to sit on the field. I wish I could do that, but it would be a truly exhausting task so instead this section will just give you a basic idea of why positioning is important. There will be more student specific position information in the units/teams section of the doc.
Firstly, your students spawn into the map based on the slot you put them into on the team building page. The student in Pos1 will spawn closest to the bottom side of the screen, while the student in Pos4 will spawn closest to the top of the screen. This is true for both Attack and Defence.
Old screenshot from BA community Discord.
Secondly, the combination of your units position and the enemies positions will affect where everybody will stop. This is important for both offensive and defensive reasons.
- The AI will (almost) always centre their EX skill on their AA target. Better positioning can lead to deeper angles for skill shots
- Having your student stop in a place where they are unlikely to get hit is ideal
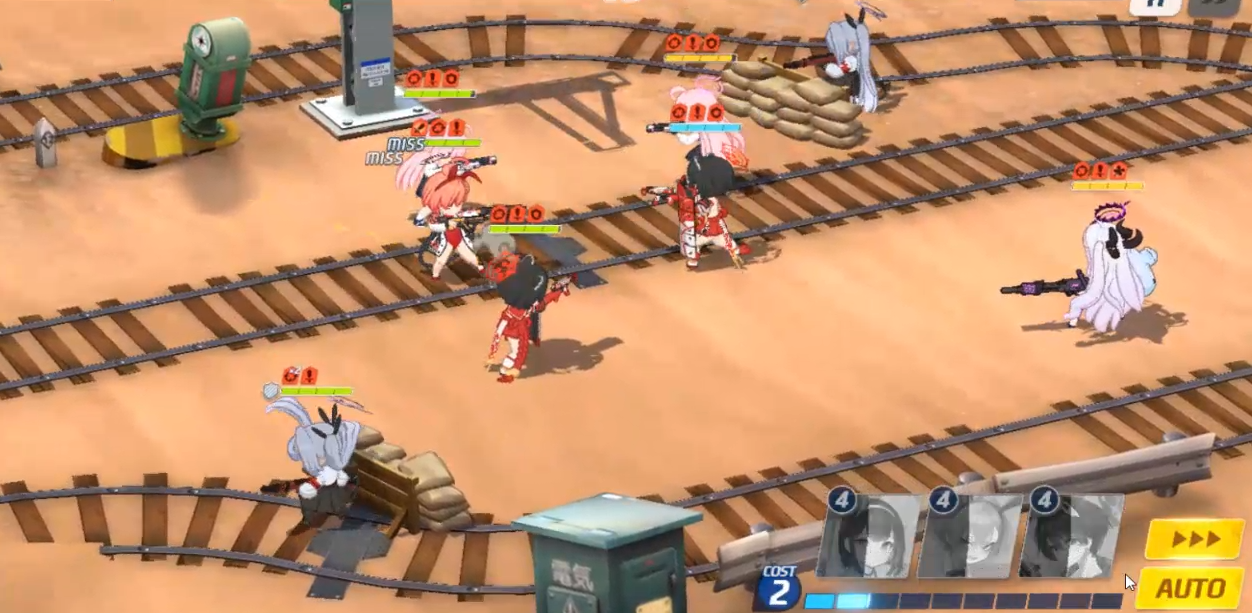
Notice the different places every student stops in these screenshots. These are different battles. Look out for especially Nonomi and Tsubaki:
SS 1.
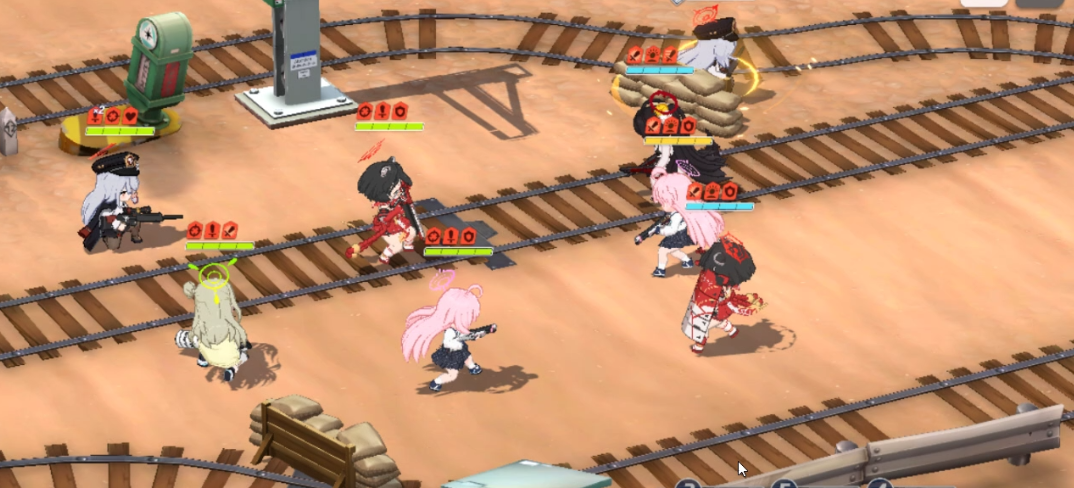
SS 2.
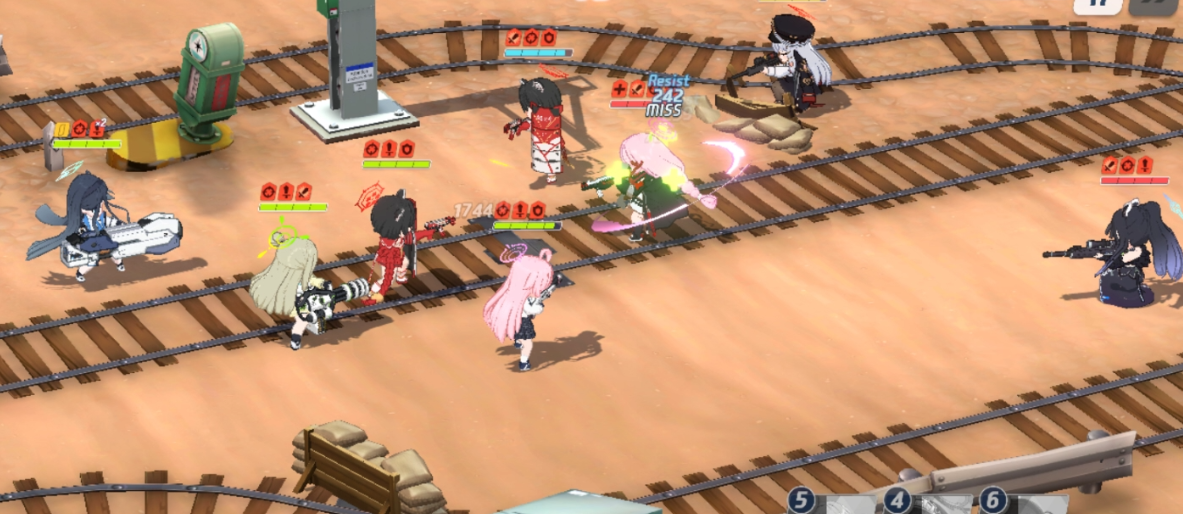
Notice how Nonomi in the 2nd screenshot is hugging Tsubaki’s behind very tightly, but in the first she is maintaining a healthy distance. This is absolutely not ideal, because any AOE targeted at Tsubaki will spill easily onto Nonomi, taking her out of the game. This won’t happen if she hangs back more.
The attacking team and their positions from the team building screen are basically the same, but on the actual field their real positions are different. The biggest reason for this change lies in the defending teams positions. The detailed explanation would take multiple pages of walls-of-text to explain, so the extremely-over-simplified explanation is: In screenshot 1, the main tanks are in D1 and D2, but in screenshot 2, the main tanks are in D3 and D4. Due to factors I can’t begin to explain, such as student range, class behaviour, and AI quirks, the difference in the defending team’s tank positioning caused Nonomi to be squished up to Tsubaki. A simple solution for this would be to place Nonomi in A1 and my tanks in A2/A3. What should happen is Nonomi will stop a fair distance beneath an A2 Hoshino; at the same time Tsubaki and Hoshino can potentially engage with the D3/D4 tanks closer to the defender side of the map. This setup is also unlikely to change the outcome of the fight in screenshot 1.
Finally, unit position can affect the time it takes for your units to begin shooting. Here’s an extreme example. Remember screenshot 1 above? You can see Haruna stopped in place there ready to shoot. She stopped there with 2:56 on the clock.
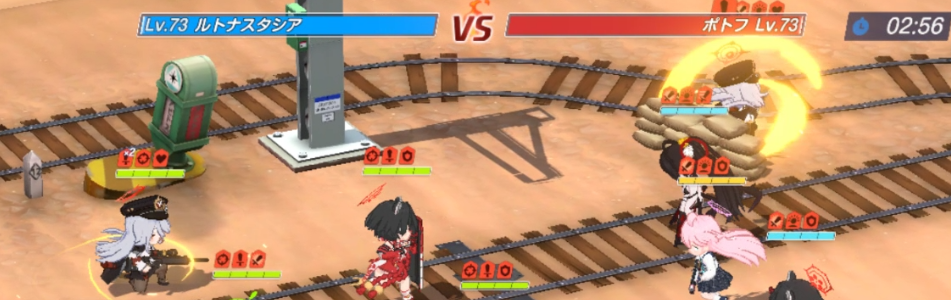
But she’s not done yet. What happens after is she moves down to the barricade at the bottom of the screen because her SR class AI wants her to be behind cover. She doesn’t start shooting until 2:50. That’s 6 whole seconds not dealing any damage when everyone else has already started shooting.
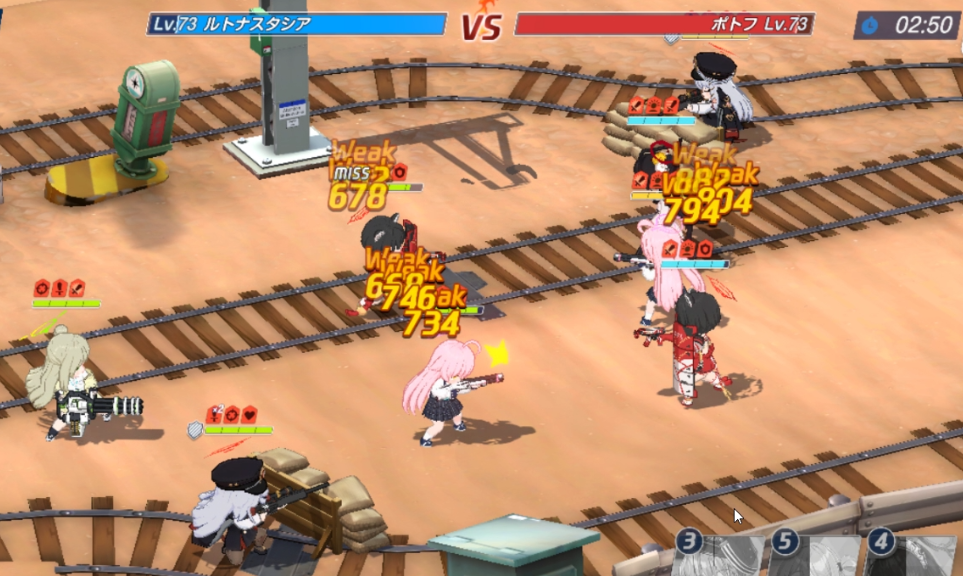
Unlike the problem with Nonomi hugging Tsubaki’s behind, this isn’t always a game changing problem – but it’s still a problem you want to iron out because every edge can matter when the battle is already filled with randomness. The solution to this problem would be to place Haruna in A1 so she spawns in the right spot to take cover and shoot immediately.
Hang on, but the solution to my previous problem was to move Nonomi to A1 – now I have to move Haruna to A1? This is where the intrigue of PvP is. You’ve got two glaring problems with your formation and you have to find a way to optimise them based on many unknowns. You’ll often find yourself weighing the pros and cons of your unit positions and having to compromise. Luckily in this particular case, the solution can be simple: Keep Haruna in A1 and move Nonomi to A4. This will allow Haruna to keep the cover and Nonomi to keep her distance.
This was the simplified breakdown of why position matters in PvP. A detailed guide for positioning would require a whole document of its own – it might happen in the future, but you will have to settle on this for now.
Terrain
You don’t notice it as much in other game modes, but in PvP terrain can drastically affect the preference for some units over others. In most cases, terrain will affect both the units you decide to pick and what position you put them in.
Each unit has terrain they like and dislike. Their mood within each terrain directly affects some aspects of their performance.
| Mood | Damage Multiplier | Block Rate Behind Cover |
| 1.3x | 75% | |
| 1.2x | 60% | |
| 1.1x | 45% | |
| 1.0x | 30% | |
| 0.9x | 15% | |
| 0.8x | 0% |
Some units can heavily prefer one piece of terrain over another, while others can be relatively neutral for each.
I don’t think the difference in damage dealt needs any explanation. More damage = good. Less damage = bad. Duh.
The one that people don’t catch is the block rate. Blocks completely absorb damage thus it plays a large part in the survivability of a unit. A unit who hates the terrain they are in will never block incoming damage when taking cover. Not only is the survivability of the unit lowered, but it also indirectly affects your other units because the sad unit is occupying cover that another happier unit can utilise instead.
Furthermore, each terrain has a different playing field.
URBAN
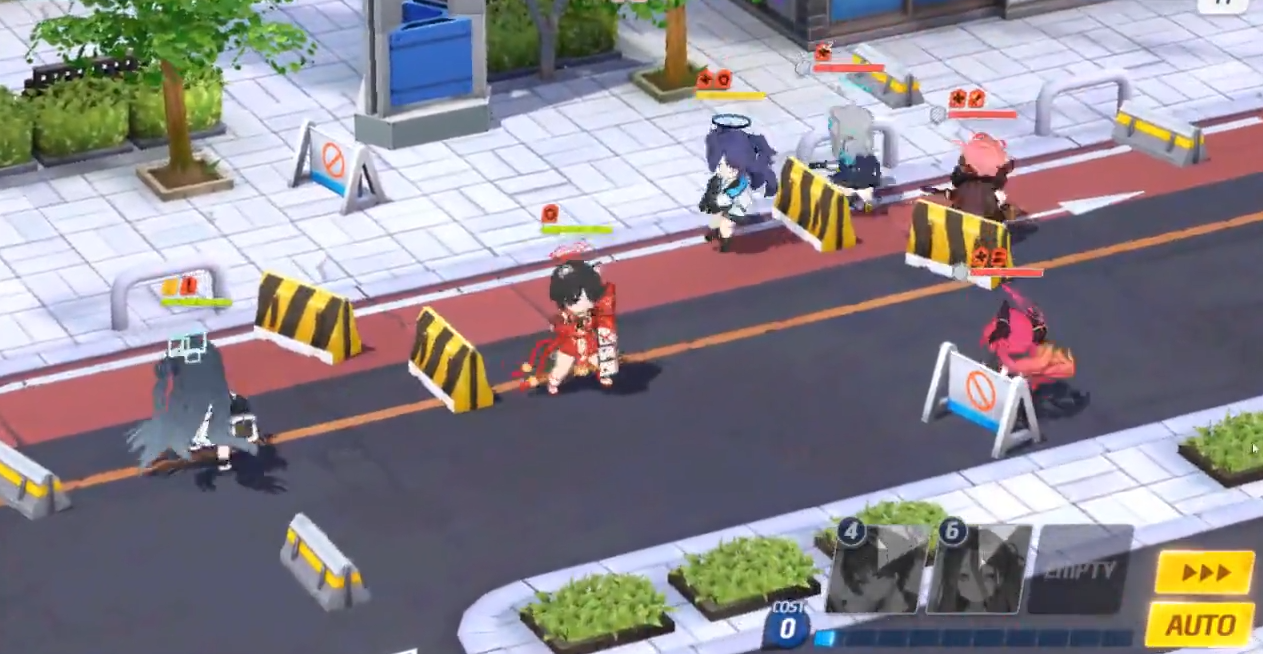
A street filled with signs and barricades for your units to take cover. There’s enough cover for all units on one side, leading to not only increased survivability for the back-line but also some occasional funny behaviours from the AI while it tries to figure out what it wants to do.
The clock tower at the top can collapse when hit by AOE skills, knocking back units standing underneath it and leaving an obstacle for your students to walk around.
Due to how many barriers there are, this map heavily favours those who can take cover. Single tank compositions were the most common, followed by double tank compositions. You would almost never see or use a triple tank formation in Urban. Teams often aimed to kill the backline first.
OUTDOORS
A barren area with only a single barricade on either side. The tower on the top of this map can also fall. The lack of cover raised the double tank meta to the top, with some people opting to use 3 tanks. You will very rarely see single tank compositions. Outdoors requires a balance of front-line and back-line damage.
INDOORS
(not out yet)
List of Defenders and the Refresh Button

Everybody’s favourite button in PvP because this is the most “gameplay” you’ll get that doesn’t include theory crafting. It randomly refreshes the list of defenders for you to attack. Lower ranks will see higher variation in their opponents because the list will attempt to show you those who are 70% of your current ladder position.
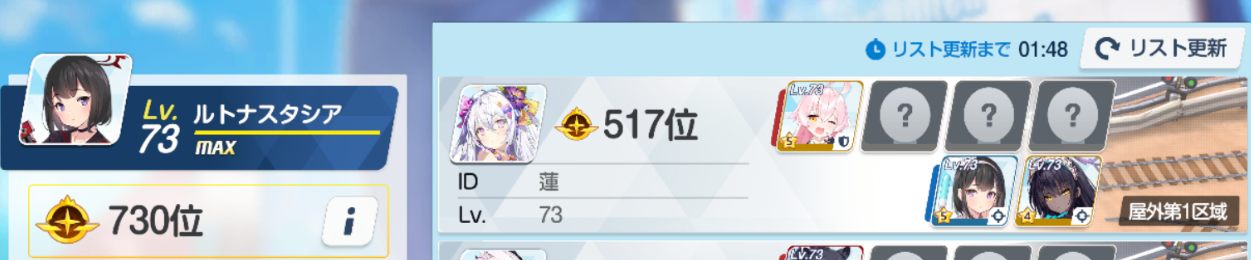
In this screenshot I am rank 730.
70% of 730 is 511, so the opponent at the top of this list will be around this rank.
This button is useful especially once you begin to understand what your team is capable of and who your preferred match-ups are. Needless to say that if you know your win conditions, you can be picky about who to go up against to maximise your win rate.
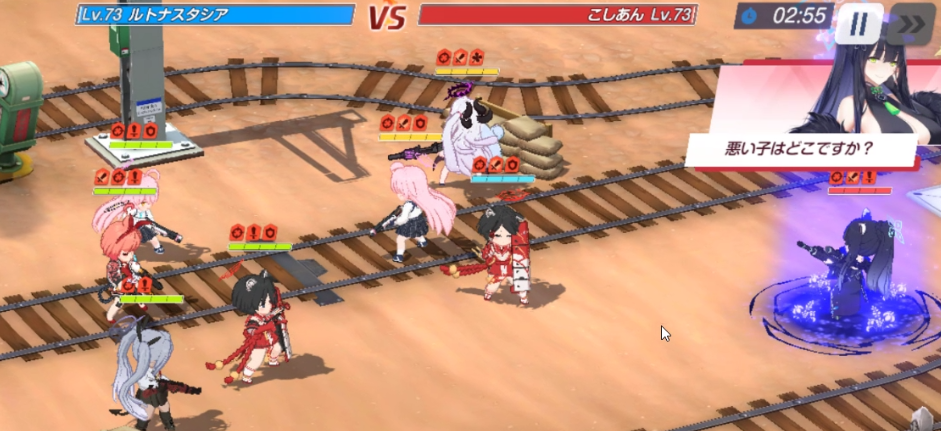
As you play more PvP and get a handle for the meta, you’ll also be able to predict teams and their positioning based solely off the unit on D1.
In the screenshot below, the visible units on the defenders side are Shun, S.Mashiro, and Hibiki.

With Shun in D1, I can make a reasonable guess that there will be a tank on D2 and D3, with S.Hina or Iori occupying D4 because:
- It’s unlikely for there to be a tank on D4 because this will introduce a spacing problem if they put DPS on D3.
- If Shun is in D1, a tank in D3 and D4 can also potentially expose Shun to a smartly placed DPS on A1, removing her from the game quickly.
- Thus, there is going to be at least one tank on D2 or D3.
- Knowing D4 is going to be S.Hina or Iori is based on experience, knowledge, and data surrounding the common picks of this terrain, outdoors.
I’m right!
Of course, this isn’t the only possible combination given the exposed students on the list. It was just a quick example to demonstrate how you can think around the information you can see. To optimise my success I will have to account for multiple possibilities with a team that can handle itself against different set-ups.
On a separate note, there will be a rank you will reach where the refresh button doesn’t really change the opponents you are allowed to attack. If you are at this point then you’ll have to start remembering player names and the teams they run to set up the right attack team; you can no longer pretend the teams you can’t win against don’t exist. Good luck.
Understanding Defence and Damage Graphs
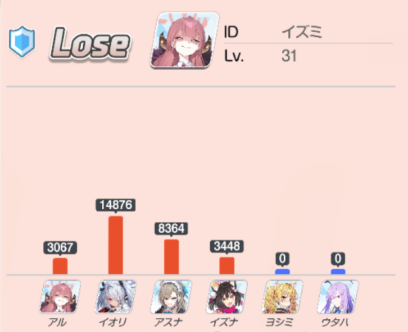
First things first, the numbers on the damage graphs in PvP are absolutely NOT a direct indicator of how good a unit is. However what it can do is tell you a story of how your battle went. Damage graphs are the only feedback you get as a defender – so if you are finding yourself with an abysmal defence win rate, you may want to start looking at your logs to try and find the problem.
There are many clues in a damage graph to help you piece together how a battle unfolded.
From this log below I can deduce that:
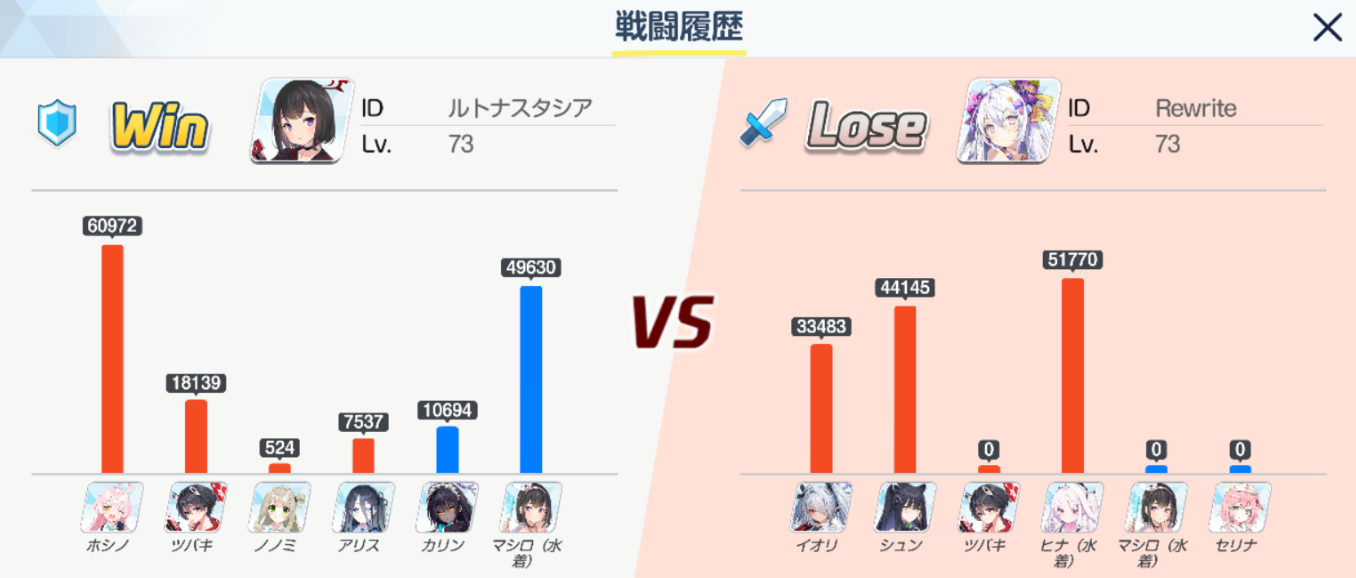
- The enemy Tsubaki doing 0 damage means she was killed instantly at the beginning of the match
- My Nonomi and Arisu also died at the beginning of the match, having done no damage even when the attacker had no tank
- Could they be in a vulnerable position?
- The enemy S.Mashiro did 0 damage. This is only possible if the battle was quick. My Hoshino must have cleaned up quickly despite not having DPS backup.
- Perhaps I need to replace my backline with faster, less risky units?
This might seem a little straight forward to some, and confusing to others. Understanding how your fights go down even if you can’t watch them will offer you an advantage in making your defending team.
Another thing you want to utilise as a defender is the element of surprise. As you climb ranks, attackers see less information about the defending team. You can absolutely use this to your advantage by deploying uncommon picks and positions. While there are indeed a handful of units in each terrain that are staple to every team comp, they are not infallible. I’m not going to reveal any secrets in this document (there are many interesting, high win rate teams), but you can be assured that your waifu can probably hold up in a defending team given the right support and the proper conditions – just be prepared to do some experimenting.
Common Picks and Example Teams
IMPORTANT: Pick rate is not win rate. Using the units and teams in this section may not necessarily increase your chances of winning.The aim of this section is to provide you the explanation for why they are the most common.
You can always be caught off guard and destroyed by what you might have thought to be a silly off-meta pick. There is a time and place for every unit, so discretion is advised when going through this section.
Also note that all data and recommendations represent the attacker because there is no reliable way to collect unbiased defender data. Maybe one day we can have good defender data, but until then you will have to do your best by inferring from attack data and experience. I periodically post pick-rate analysis for the most recent banners on Reddit. Links in the appendix. IMPORTANT end.
Urban
Disclaimer: Take this section with another grain of salt. Urban was the first season of PvP in JP servers – a period where everybody was only starting to get comfortable with the game and doing extensive testing on what could be good or not. What’s more, there is no good data to back this section up unlike in Outdoors because there was no way to collect it in an unbiased manner. This section is thus the result of months of conversation in Discord amongst regular PvP’ers. Once Urban comes around again and data becomes possible to collect, this section will be reworked. Disclaimer end.

Shun and Haruna are extremely strong in Urban due to their mood boosting how much damage they bring to the team. Shun will quickly eliminate any opposing backline while her Ex is up allowing for fast and easy wins. Meanwhile, Haruna was the only option to counter Tsubaki at the time. The two of them together meant you could quickly delete the whole enemy team. On the chance that Shun or Haruna couldn’t do it, Nonomi and Hibiki also provided AOE sweeps on the backline. All of this meant that 1 tank comps were common at the beginning because it was a race to proc as much damage as you can.
Unlike Shun and Haruna though, Nonomi isn’t able to utilise cover. To boost survivability some players opted to deploy a second tank. This would have usually been Hoshino and rarely Yuuka; they are both capable of flanking and dealing good damage while still doing well as a tank.
Karin and Alice deserve honorable mentions. Their mood works against them in Urban but they fill in a niche that can still see use. Karin helps with fighting against two-tank compositions, while Alice can act as Shun-bait while still doing respectable damage.
Finally, summer units weren’t available until near the end of Urban season. S.Mashiro and S.Hina don’t excel in Urban but for the brief period they were certainly worth using.
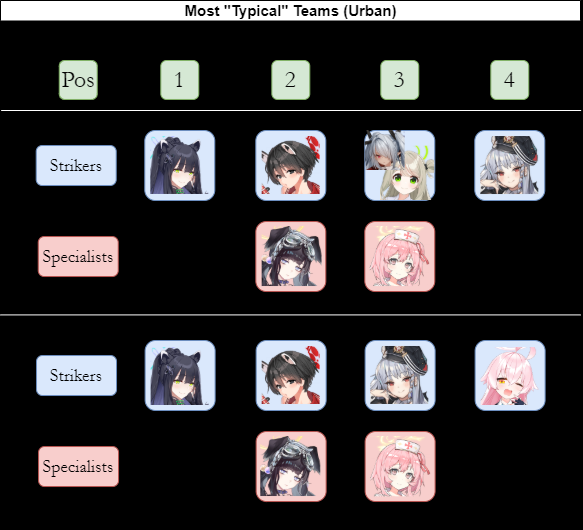
The positioning of Urban teams have a lot of variance, and you shouldn’t try to follow the above examples strictly. The large availability of cover in Urban means your DPS units can sit anywhere and still be relatively safe. What you need to think about instead is knowing how to adapt your attacking team to defender positions for stronger angles with AOE units like Haruna, Nonomi, and Iori. This is especially true in single tank teams.
Angles aren’t as important for double tank teams, but you should still think about them when you can.
Outdoors
Below is a graph of the most common outdoor picks ordered by pick rate. % represents how often each student appears in any position on the attacking side.
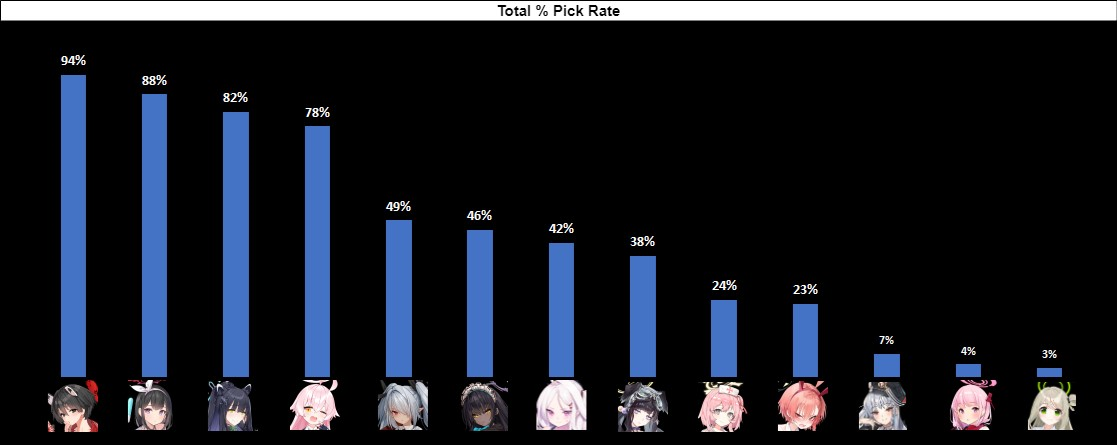
Outdoors turns picks that were already good in Urban such as S.Mashiro, S.Hina, Hoshino, and Karin into even stronger picks. The rise of these picks pushes Haruna into low priority because S.Mashiro now does Haruna’s job but better, and Hoshino has a high chance of making Haruna useless.
Despite having no hit to mood, Nonomi falls out of favour in place of S.Hina, because the mood boost to S.Hina allows her to get the same sweeps Nonomi can for cheaper while also providing CC.
The introduction of Bunny Neru also popularised triple tank formations since Bunny Neru has a good chance of sniping Shun and shrugging off damage from S.Mashiro.
Finally, more yellow tanks means more Karins and more Ioris who both excel at removing the enemy frontline from play. Hibiki still does Hibiki things but the rise of S.Hina means there is some role overlap. Meanwhile, Karin’s ability to instantly delete a yellow tank (and sometimes Tsubaki!) while also providing a team-wide attack buff cannot be replaced.
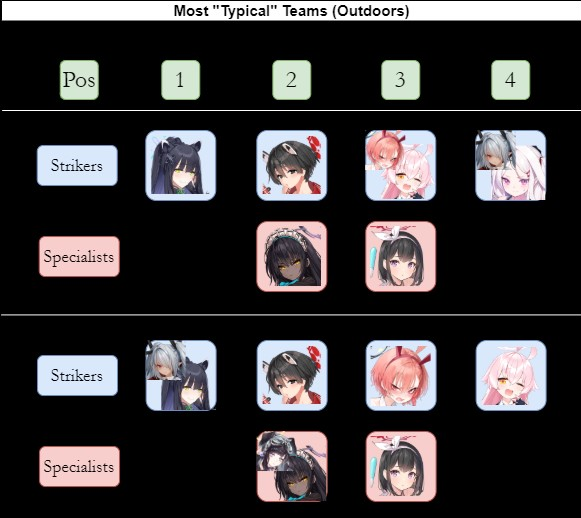
The sole barrier on the attack side is most accessible from A1, so Shun (and any other SR) is usually found here. Your main tank is usually in Pos2 and your 2nd tank in Pos3. Pos4 is typically occupied by a unit with flanking potential (Hoshino) or someone who would benefit from deep angles (S.Hina, Iori, Nonomi).
Indoors
(Not out yet)
Speculation:
- Iori’s playground
- Less yellow tanks
- Increased red tanks because
- Shun is weaker
- Iori is stronger
Unit Overview (A-Z)
Only writing up the most popular students. I’m expecting to add to this when Indoors comes out.
HARUNA

Most Common Attacking Positions: Pos2, Pos3 (?)
Roles: Frontline-killer
Haruna’s value is in her ability to one-shot kill Tsubaki. Other than S.Mashiro, Haruna is the only student who is capable of this without being absurdly expensive or risky to run. Haruna has greater potential if you experiment with different positions because she is also capable of picking off the backline with her skillshot EX.

HIBIKI
Specialist Slot.
Roles: Team-wide sweep, team buff
Hibiki is the ultimate do-it-all character of Blue Archive. She is extremely capable of destroying any opposing student anywhere on the map. On top of her ridiculous damage is a teamwide crit damage buff to make sure your opponent is really dead. Her sole downside is her relatively low accuracy and crit reliance.
HINA (SWIMSUIT)
Most Common Attacking Positions: Pos3, Pos4
Roles: Backline-sniping, CC
S.Hina is capable of hitting the entire enemy team with her EX which often kills the backline. The low cost of this EX puts her at a speed advantage compared to Nonomi – unfortunately, S.Hina’s damage against the frontline leaves a little to be desired. To compensate she can periodically stun the unit she is attacking. Overall a low risk unit with plenty of benefits.

HOSHINO
Most Common Attacking Positions: Pos2, Pos3
Roles: Tank, CC, Displacement
Hoshino is Tsubaki’s best buddy-in-crime if you choose to run 2 tank comps. Her ability to displace the front-line can put the enemy backline in range of your team. The stun on her EX has game-changing potential if it cancels a crucial enemy skill; you might even get a lucky backline snipe. Solid base stats to tank and does good AA damage too.
IORI
Most Common Attacking Positions: Pos1, Pos3
Roles: Frontline-killer
Absurd base stats, crazy multipliers, low costs, and an accuracy buff to boot. Iori has everything in her kit to faceroll not only yellow tanks, but Tsubaki too. The cherry on top is the splash damage. If you set her up correctly, Iori has the potential to take out a whole team on her own. This unit is balanced solely on the fact that innate game mechanics weakens her damage to red armour.

KARIN
Specialist slot
Roles: Frontline-killer, team buff, CC
A solid specialist who passively provides a potent attack buff to the whole team. Her single target nuke will instantly remove any yellow tank from play. It can also kill Tsubaki but a lot of things need to go your way for this to happen. Karin may stun the enemy on occasion which can have game changing consequences.
MASHIRO (SWIMSUIT)

Specialist slot
Roles: Frontline-killer, team buff
One of two characters who are capable of instantly killing Tsubaki. Unlike Haruna, S.Mash is almost incapable of missing her skill. She also brings a team-wide accuracy buff to help the rest of the team in killing Tsubaki ASAP just in case S.Mash couldn’t finish the job. These benefits gives S.Mash a priority pick over Haruna if you need your slots for other roles.

NERU (BUNNY GIRL)
Most Common Attacking Positions: Pos3, Pos4
Roles: Tank, CC, Backline-sniping
Possessing multiple evasion buffs on top of a strong shield, B.Neru is a risky pick who can survive against things yellow tanks normally can’t – if luck is on your side. If she survives long enough she is capable of literally jumping into the backline and picking them off in CQC. A great foil to Shun, I just hope you like gambling as much as you like bunny girls.

NONOMI
Most Common Attacking Positions: Pos4, Pos3
Roles: Team-wide sweep
Welcome to the Nonomi Roulette. Nonomi is a high-risk, high-reward student who is capable of sweeping a whole team by herself. Unfortunately, her EX is high cost and she is easily sniped due to her low HP and red armour. A cheap investment in Nonomi can get you quite far – but you better hope you win the roulette.

SERINA
Specialist slot
Roles: Healer
Serina provides a cheap, fast, no-fuss heal that is quite potent even without much investment. She is your best option if your aim is to outlast your opponent.

SHUN
Most Common Attacking Positions: Pos1, Pos3
Roles: SP generation, Backline-sniping
Even if Shun did no damage, her ability to instantly generate SP at the beginning of battle is extremely strong and makes her worthy to bring on that reason alone. What makes her over the top is that she is a really potent auto attacker armed with an EX which targets students with the highest ATK value. You should absolutely be using her if you can.

TSUBAKI
Most Common Attacking Positions: Pos2, Pos4
Roles: Tank, CC
The tank of Blue Archive. She has a near 100% pick rate for a reason. Tsubaki evades most shots thrown at her, and anything that does happen to hit her will be shrugged off due to high defence. Being blue armour is a huge advantage as there are not many blue DPS options. If you don’t run her you are sandbagging yourself.
Appendix
PvP is like a Trading Card Game
TCGs are games driven by randomness. No matter how great your deck is, you are subject to the luck of the draw. Your starting hand and the cards you continue to draw are all decided randomly meaning you always have a chance to lose if things weigh against you. It is commonly accepted in TCGs that losing is a natural fact.
But TCGs aren’t driven purely by randomness. You can choose what cards go in your deck. The first consideration is if you want to spend money on the meta cards, or use your favourite (“waifu”) cards. Both are equally acceptable; there’s plenty of cases in TCGs where someone’s favourite non-meta deck comes out on top. Admittedly, your favourite (“waifu”) cards will often take far more effort, research, and investment to be competitive – but they will always have a time and place where they work.
Then, you need to think of a way to put your cards together in a cohesive deck that synergises and plays off of every other card’s weaknesses and strengths. Some cards may be stupid strong, but no card can ever be complete without a supporting deck.
Finally, even if you have found yourself a deck that does well and has good win rates, TCGs can release new cards and rules to shake things up. It is up to you as a player to adapt to these new cards and rules. Those who don’t adapt will often fall behind.
In Blue Archive, the ruleset is the terrain, and the cards are your girls. The appeal of PvP is to construct together a solid team that can cover for every unit’s strengths and weaknesses so that you are able to take advantage of good luck and mitigate bad luck. You may hate TCGs, and that’s perfectly fine, but it is dishonest to say that PvP leaves you helpless and is a product of pure RNG.
Thanks Ebil for the idea.
Links to my monthly pick rate analysis posted on Reddit:
- 2021-10-30: Outdoors – Bunny Girl Banners
- 2021-10-02: Outdoors Month 1
BA Player
Wednesday 15th of December 2021
And the only thing I've managed to be lucky enough to get is Tsubaki. I guess there isn't really any counterplay in this game and the answer is to whale. Too bad.
Hejin
Saturday 11th of December 2021
Finally. most of the time Tsubaki always get 1 shot for out of the blue while my opponent tsubaki is like cheating for some reason
Ruck
Sunday 5th of December 2021
30% of positioning skill, 70% of pure RNGesus to one-shot kill your Tsubaki and wipe entire backliner. I also image if the PvP were live active-battle it would be more chaotic and (possibly) pay to win to get meta student.
I still hate PvP
john
Sunday 14th of November 2021
This is absolutely crucial information for us newbies. This article is also not seen anywhere else
sussy
Sunday 14th of November 2021
Thx for the guide