Made by Causew#5130 for the Blue Archive community. Huge credit to them for the massive effort involved in putting it together!
If you’re interested in more Blue Archive content, we have a Blue Archive Tier List guide that rates every unit in the game. You might also be interested in our Blue Archive Coupon Codes page for free pyroxenes to spend!
It’s not a tier list. Unit comparisons and analysis for best DPS won’t happen here.
This guide is to give you a general idea of the strategies you can employ against Raid bosses. It aims to keep the strat discoveries in #jp-raid of BA Discord in place because Ctrl+F’ing in Discord can be garbo. Link to said Blue Archive Discord
So far written to help with clearing Extreme, although the information will still be useful in lower difficulties if you’re struggling to beat them for the first time. That said, almost all strategies do not matter if you kill the boss before they can do anything. This especially applies to Hardcore and below where you can brute force every boss with pure DPS. Unless there are many requests, this guide will not cover highscore teams.
- If you’re a top %’er, this guide will not help you.
- Contact Causew#5130 or /u/VirtualScepter for feedback.
- Questions related to raids and strats can go to #jp-raid.
- Thanks everyone in #jp-raid for helping solve the bosses every season.
Perorozilla

Unlike other raid bosses, Perorozilla has no phases. Succeeding against Perorozilla not only requires you to teambuild correctly, but also having a mechanical understanding of the game and your students. There is no RNG here, just skill. In other words:

Basic Info
Skill 1: Incandescent Eye Laser
Inflicts DOT damage against one student for 10 seconds. The initial hit applies 60 seconds of -9999 defence.
How to deal with this:
- The defence down effect is cleansable. If you plan to directly tank the eye laser on Extreme, bringing a cleanse to the fight is compulsory because the laser will absolutely kill the targeted student
- Alternatively, you can bring Hifumi or Utaha to summon your own Peroro-sama or Turret to tank the laser for you. The eye laser is always fired at a fixed time after he summons his Mini Peros – meaning you can summon the bait preemptively.

You can’t tell, but that is Peroro-sama who is being fried by the eye laser.
Skill 2: Summon Peroro Minions
Perorozilla summons Mini-Peroros.
- 100% of damage dealt to Mini-Peroros are reflected to Perorozilla.
- Mini-Peroros are knocked to the ground when they fall below 50% HP.
- Mini-Peroros will move in a fixed pattern.
- Mini-Peroros cannot be displaced and CC’d in any other way.
- If a Mini-Peroro is at 0% HP, they will continue to reflect damage to Perorozilla.
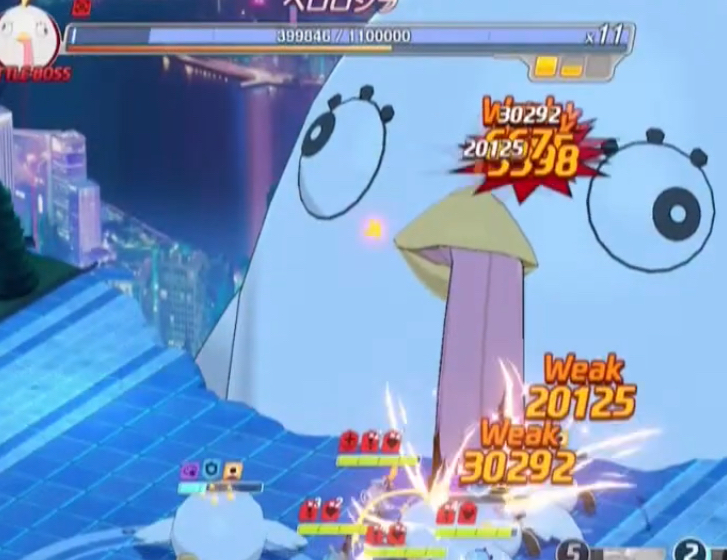
Screenshot showing all damage from Peros reflecting to Zilla, even if Peros are 0HP.
How to deal with this:
- Just shoot them lol.
- Take advantage of the fact that there are multiple mini peros. Bring AOE for maximum DPS
Skill 3: Absorb Peroro Minions
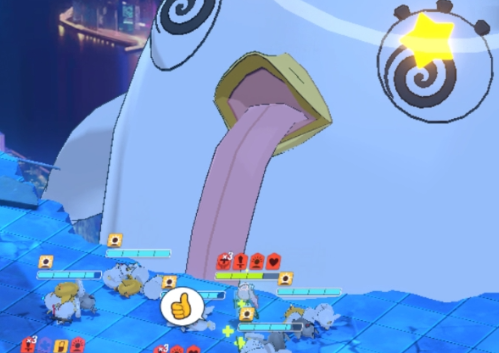
After a fixed amount of time, Perorozilla eats the Mini-Peroros gaining stun gauge according to how many Mini-Peroros were knocked. Perorozilla is stunned after eating 7 Mini-Peroros.
While Perorozilla is stunned, 5 Skinny-Peroros will be summoned. These Skinny-Peroro’s have little to no defence and also reflect damage to Perorozilla.
How to deal with this:
- Ensure you’re bringing enough AOE to knock the mini peros. The stun window will provide you a big DPS boost.
Stunned Zilla and 5 skinny peros
Skill 4: Hyper Spiral Eye Laser
Peroro deals 300% damage to the whole team when the ATG bar is full. A cutscene will play and the stage will look different (but is the same in gameplay)

How to deal with this:
- You’re going to have to tank it. It should not one shot you but keep an eye on the skill bar and make sure your students are healthy
General Team Building
Having a way to deal with the laser is compulsory. To reduce clutter, I won’t include these options on the main chart, but I will still list them here for you.
Each team must have any of:

Directly tanking the laser is technically possible with extremely strong single target heals (Hanae, Eimi) or shields (Yuuka, Hoshino). This is not recommended because the investment required is very high and even then it won’t be a very cozy clear.
The rest of the team will consist of whatever blue damage dealers you can bring.

Strategies
Strat#1 – Lining up the mini peroros
Score Potential: Compulsory
Consistency: Skill based

The above image was not a joke. If you want to clear this boss you’re going to need to utilise your AOE and get as many hits in as possible. Every single extra hit is practically a straight multiplier to your damage. To do this, you have to learn your skills timings, skill rotations, and skill range inside out. You can copy team comps but if you consistently miss your skills then you will not have a good time.
Timings and rotations will be unique to the team comp you run, so it’s best you go into practice mode and try to solve the boss yourself. I can provide you some food for thought to help mitigate the learning curve though.
Perorozilla’s patterns are fixed. Meaning if you do the same thing every run, then you will be dealt the same result every time. If something is not working, change it up. If something is working, keep doing it.
Every unit in every position will have unique aim and timing points. For example, an Arisu or Haruna on Pos 1 or Pos 4 will always have an easy line-up on the first set of pero summons.

Pos1 Arisu with free line-up on wave 1.
But the next set of summons will need to be shot from an angle.

Aiming the Pos1 Arisu sideways to get max hits.
The opposite would happen if I put Arisu in Pos 2 or Pos 3. I’ll need to shoot at an angle in the first wave but line up an easy straight on the second wave. It’ll be up to you to decide and learn what angles you want to be lining up.
You need to account for the movement of the peros, as well as the warmup time for your skills. Self explanatory. Notice how far ahead I’m aiming with Haruna in the examples below. She takes ages to get the Ex-skill going so the lead I’ll need for maximum hits can be pretty tricky. The width of her skill shot is quite narrow too, leaving little room for error.
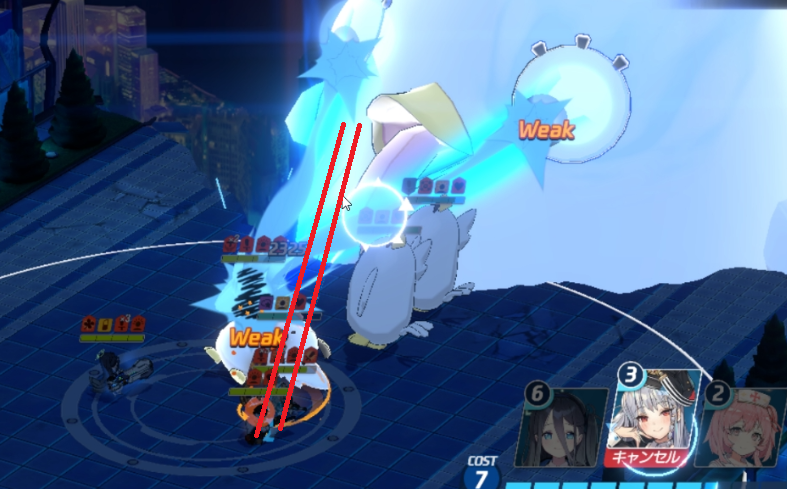

Both these screenshots landed max hits.
You can “manipulate” the peros by KO’ing them in a preferred spot.
The way the peros move around can be pretty annoying. Luckily you can stop them in place by KO’ing them. Less moving targets = easier time aiming.
The way I’ve knocked two of these peros means I only need to account for 1 of them moving.
This is especially useful on Bunny Karin. BKarin cannot normally get max hits on each wave – but if you KO the peros beforehand with a ST nuke like Swimsuit Azusa you may be able to find yourself a good angle. This is probably what the Top1 one party clear is doing, but I don’t think we’re going to get a tutorial anytime soon:

This team is not recommended. This guy is top1 for a reason, and that is his big wallet and big brains.
Also know that this all means you can mess up your angles if you down them in a bad spot:

In this pattern, none of my units can get any more than 1 or 2 hits. Not ideal.
Example Runs
Perorozilla Extreme
12,269,011 score, 2 teams, Indoors clear by Adipose9:
Blue Archive – Perozilla Extreme 2 Team – 12,269,011
11,831,890 score, 2 teams, Indoors clear by Causew:
Blue Archive – Perorozilla Raid – 2 Team Clear – Extreme – Indoor – 11,831,890
Perorozilla Hardcore
6,990,399 score, 1 team, Indoors clear by Adipose9:
Blue Archive – Perozilla HC – 6,990,399
Kaiten FX Mk.0

Amour Type: Light
Kaiten Extreme
HP: 12.500.000 (Phase1: 5.000.000 Phase2: 7.500.000)
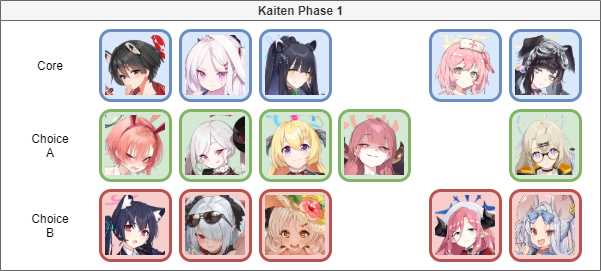
Phase 1 – Sushi Rangers
Phase 1 requires more planning than Phase 2. You want to try to defeat the rangers in a single team since they can deal an absurd amount of AOE damage and wipe your other teams early.
Basic Info
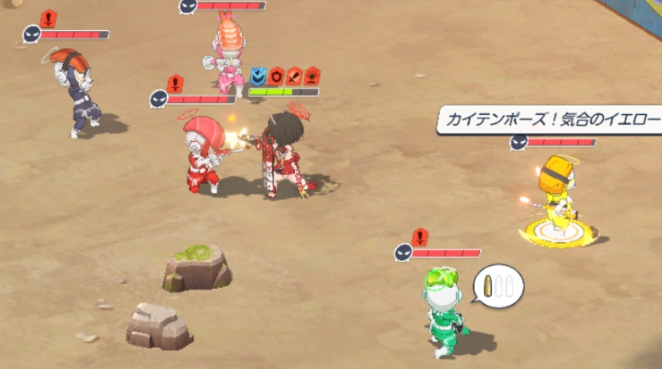
Skill 1: Kaiten Pose!
Each ranger has a unique skill. They will strike a pose and yell before executing their skills.

Red Ranger – Taunts your team and prevents strikers from using their Ex Skills. Will also cancel any ongoing skill animations. This one is really the only one to look out for.
Yellow Ranger – Does a high damage, single target attack
Pink Ranger – Buffs the attack power of her fellow rangers
Green Ranger – Does a continuous line shaped AOE attack
Black Ranger – Applies an increased damage taken debuff to a single target
How to deal with this:
- Apply crowd control to the rangers as they are posing. This will cancel their skills.
- CC = Taunt (Tsubaki), Stun (S.Hina, S.Izumi, Suzumi), Fear (Kayoko)
General Team Building
Strategies
Strat#1 – Just do damage lol.
Score Potential: S
Consistency: A
Typical team comp:
- Must have either Tsubaki or Bunny Neru
- Serina, S.Hina, and Shun are ideal
- Any other damage dealers, AOE preferred. Otherwise strong ST AA
- Hibiki or Kotama
It’s entirely possible to just hit them until they’re dead without trying to do anything fancy, but it requires a specific team comp on Extreme. Tsubaki or Bunny Neru are non-negotiable, because they are the only units with enough HP, defense, and evasion to tank the rangers for the whole 3 minutes. In fact, sometimes you will be unlucky and they will still die.
Besides obviously keeping the tank healthy, Serina is needed to reposition the tank next to Red Ranger. This is to ensure that your backline will not get hit by Green Ranger’s AOE or Black Ranger’s attacks (Neru can do this on her own without Serina’s help).
S.Hina, Shun, and Hibiki are the biggest damage dealers you can bring in this phase. Without them your hopes of passing Phase 1 (extreme) aren’t good unless you can utilise the other strats below.
All rangers are aggro’d on Tsubaki here
Strat#2 – Reposition Rangers with Tsubaki
Score Potential: A-S
Consistency: A
Typical team comp:
- Tsubaki and Serina are mandatory
- S.Hina and Shun are optional, but they are still your better damage dealers
- AOE damage such as Aru, Akari, and Hibiki are preferred
You can use Serina to pull Tsubaki to the bottom right side of the map. Once you do, using Tsubaki’s taunt will drag the Black ranger down closer to Pink and Red ranger. This opens up the possibility of clearing Phase 1 with strong AOE dps like Aru and Akari without the need for S.Hina. Tsubaki needs to start in position 2 or 3 depending on your team.
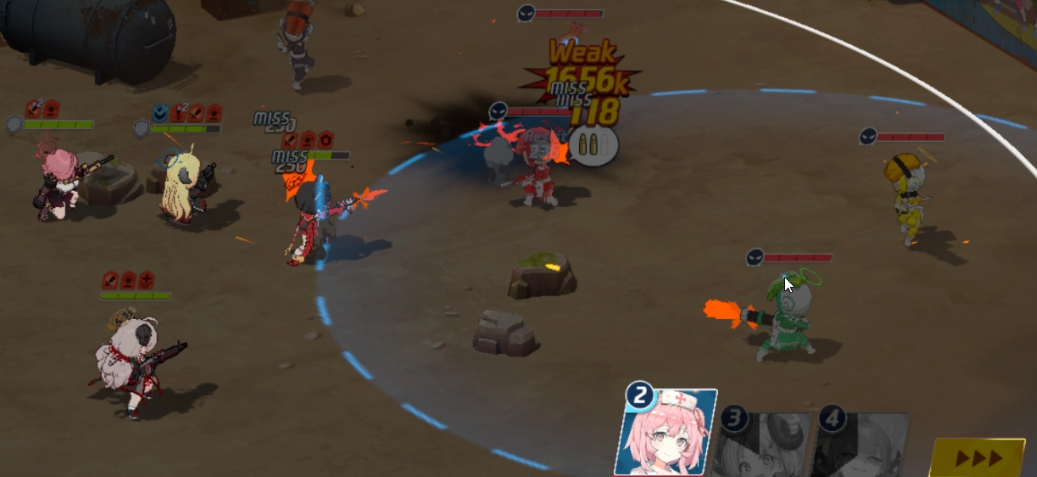
Drop Serina Ex about here, then taunt. Tsubaki started position 3 here (she swapped places with Akari after fight start)

This allows Aru and Akari to hit 3 targets, propelling their damage to top tier when they are otherwise weak single target

This also allows Hibiki to hit at least 7 mortars with her Ex, making Hibiki even more powerful than she already is
Overall, this strat can be potentially weaker than just using Shun and S.Hina, because you have to spend 6 cost to reposition the Blue Ranger instead of just simply doing damage. Of course, you could also do this with Shun and S.Hina, bringing your score potential even higher than killing them vanilla if your AOE units have heavy investment.
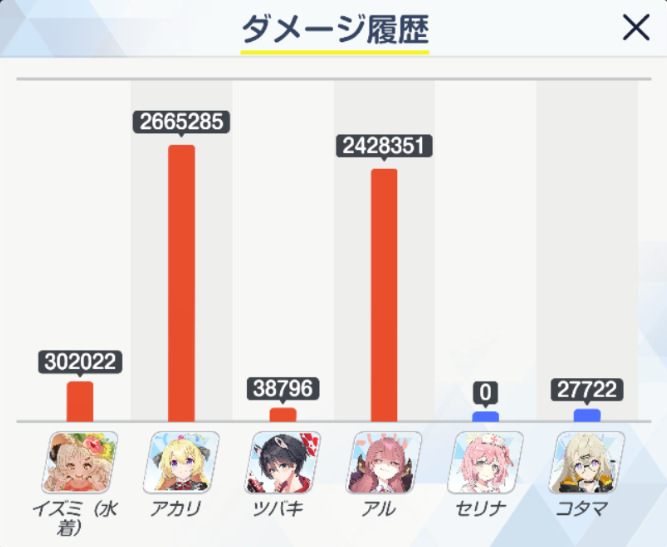
Proof that you don’t need S.Hina or Shun to pass phase 1 (5.5m total dmg) … but it’s quite expensive to get to this point. You can save yourself the headache by just borrowing an S.Hina. (Source: me)
Strat#3 – Reposition Rangers with Juri
Score Potential: ??
Consistency: ??
Typical team comp:
- Tsubaki, Juri, and Koharu
- S.Hina and Shun are optional, but they are still your better damage dealers
- AOE damage such as Aru, Akari, and Hibiki are preferred
Juri offers an alternative repositioning method if for some reason you don’t like the Serina + Tsubaki technique. It gives all the same benefits as the Tsubaki/Serina pull, but with the bonus that Juri is much easier to use. Her Ex-Skill is point-and-click and it drags all the rangers in range to the middle of the skills AOE. What’s more, this strat works even with a Lv1 Juri.
Unfortunately, Juri does not cancel the ranger’s skills. Koharu also becomes near mandatory because she will be the only healer that can keep up with the AOE damage the rangers output while you’re fiddling with Juri’s EX. You also have to consider the opportunity cost of having an entire team slot dedicated to the sole purpose of repositioning the rangers AND you won’t have access to Koharu in phase 2.
Not really recommended unless your AOE damage dealers (e.g. Aru, Akari, Hibiki, Saya) are really really strong. The strength of your AOE units flops this strat between C tier and S tier.

4 Rangers grouped on top of each other after eating many Juri EX’s.
Phase 2 – Kaiten FX Mk.0
Phase 2 is easier than Phase 1, and can be overcome by throwing enough bodies at it until it dies. In general, strong single target units are your best friend. You also want to bring at least 1 multi-hit ability to bring down the shield and a healer for every team. Not much else to say.
Outside of brute forcing, there’s only a single strategy worth talking about.
Basic Info
Passive 1: Kaiten Aura
Kaiten passively cycles through different Aura’s, indicated by the large coloured circle by his feet.
Red Aura – During this time, the first EX ability will turn Kaiten’s next attack/ability into a stunning attack. i.e. If Kaiten’s next attack is single target, it will only stun 1 unit. If Kaiten’s next attack is AOE, it will stun multiple units.
Pink Aura – Increases Kaiten’s attack power
Green Aura – Increases Kaiten’s defense by 1000
How to deal with this:
- You just have to put up with it. Just be mindful of who is using EX skills when you see the Red Aura, cause it may be potentially cancelled.
Skill 1: Kaiten Shield
Kaiten puts up a shield, greatly increasing its defense for a duration.

How to deal with this:
- The shield can be destroyed by using a multi-hit skill that does 10 hits or more. This must be an EX skill. Basic attacks or normal skills will not destroy the shield.
Kaiten has other skills such as AOE damaging skills, but those aren’t preventable so it won’t be listed out. Just remember to bring a healer
General Team Building

Strategies
Strat#1 – Mutsuki reposition
Score Potential: S
Consistency: Fuuka
Typical team comp:
- Mutsuki and Fuuka
- Anyone else
It’s possible to position Mutsuki in such a way so she can land all 3 of her mines from her normal skill, propelling her damage to be even better than Azusa’s. Tricky work though.

Source. Thanks Toir
Alt Source (Video Download)
There is also a single specific setup that lets you triple mine on Mutsuki without any manipulation. (So far it looks like this only works for Outdoor; going through Urban testing rn).


Example Runs
Kaiten Extreme
12,627,196 score, 2 teams, Outdoors clear by Adipose9:
ブルーアーカイブ Kaiten Raid – EX 2 team – 12,627,196
12,438,824 score, 2 teams, Outdoors clear by Toir:
【ブルーアーカイブ】 Kaiten FX Mk.0 EX 2凸 – No Azusa「1243万」
Kaiten Hardcore
7,060,372 score, 1 team, Hardcore clear by Toir:
【ブルーアーカイブ】Kaiten FX Mk.0 HC「706万」
7,050,666 score, 1 teams, Hardcore clear by Adipose9:
Blue Archive Kaiten Raid – Hardcore – 7,050,666
ShiroKuro

Armour Type: Mystic
ShiroKuro Extreme
HP: 10.500.000 (Shiro: 4.500.000 Kuro: 6.000.000)
Phase 1 – Shiro
Phase 1 is generally harder than Phase 2. You want to try to defeat Shiro in a single team, since bombs can be an unpredictable threat to your score (and sanity).
Basic Info
Skill 1: Boom!
Shiro drops a ball over your units. After a certain amount of time they explode, dealing damage and knocking them back. The knockback direction is in a straight line from the centre of the AOE. The balls and their effects can stack, meaning you can get knocked back and hurt by multiple balls. Damage is doubled when Shiro has a full skill gauge
The ball targeting is mostly random, attempting to target at least one student (need testing).

How to deal with this:
- Reposition your units outside of the indicated AOE using repositioning abilities
- Man up and heal it off
- JustReset™
Skill 2: Roll!
Shiro throws a giant ball down the lane they are occupying, knocking your units back and dealing massive damage.


How to deal with this:
- Reposition your units outside of the indicated AOE using repositioning abilities
- Fill up the stun gauge, making Shiro fall off the ball and cancel the attack. Not really controllable
General Team Building

Strategies
Strat#1 – Koharu + Massive DPS
Score Potential: S
Consistency: S-for stress
Typical Team Comp:
- Koharu
- All the biggest blue DPS you can bring. Refer to tierlist for best ones
- Damage buffing specialists such as Hibiki + Kotama
Unga Bunga. Basically you’re just trying to kill Shiro fast enough before you get double bomb’d. That said, you’re still going to want some healing because non-tank units will not be able to eat more than 1 or 2 balls in Extreme. Koharu does this job the best because she has a passive healing ability that can fully top up another unit without cost. Serina can passive heal too, but Koharu has the benefit of an AOE heal at only 3 cost just in case a bomb hits multiple units at once.
The difficult part about this strat is there are no contingencies against bad bomb RNG. If Shiro drops multiple bombs on the same unit and you have no way to reposition them, then you can kiss your run goodbye.
However, If you manage to win out on the RNG, you will beat Shiro with time to spare. This allows you to get damage on Kuro and you will earn yourself a better score since you have less HP to chew through in P2.

Haruna about to eat it. Thx Stokesia for image
Strat#2 – Healers + Repositions
Score Potential: B
Consistency: A
Typical Team Comp 1:
- Same as Koharu + DPS comp, but with Serina instead of Hibiki
Typical Team Comp 2:
- Izuna and/or Asuna
- At least one big blue DPS such as Haruna or S.Azusa
- Koharu optional
- S.Tsurugi optional
- Serina + one damage buffing specialist
If you don’t want to reset 24 times a ticket and thus draining yourself of all your sanity, you can choose to lower your dps potential for some controllable survivability. Asuna and Izuna can reposition themselves at a very cheap cost, all the while buffing themselves and providing solid DPS. If your S.Tsurugi is built, she is also a solid option to provide decent DPS without worrying about her HP.
It’s still important to beat Phase 1 in a single team, so you’ll still need big damage like Haruna. Since Haruna cannot save herself, you can use Serina to move her out of an otherwise deadly bomb set up.
All in all pretty low risk, but you better have a well equipped roster to deal with Phase 2, since you will be left with a fully healthy Kuro to defeat.
Phase 2 – Kuro
Phase 2 can be beat by throwing enough bodies at it. They don’t even need to be blue units, a Binah team works fine. That said, there do exist some niche strats to ease the pain of body throwing.
Basic Info
Skill 1: Charge!
Summons a prop. After a short time the prop will charge in a straight line, knocking back and dealing damage to the first unit it hits. This knock back and damage can stack between different props. Damage is doubled when Kuro has a full skill gauge

Twitter post showing all possible attack combinations
How to deal with this:
- Reposition your units outside of the indicated AOE using repositioning abilities
- If you successfully dodge the attack, it is possible for Kuro to sometimes attack themselves. This will do minor damage and will build up the stun gauge.
- Kuro is momentarily stunned after filling up the stun gauge, resetting attack patterns and their skill gauge.
General Team Building

Hit up Stokesia’s sheet for better info
Strategies
Strat#1 – Blocks
Score Potential: B
Consistency: A
Self explanatory. Bring Hifumi/Shizuko/Utaha to summon Peroro/Carts/Turrets to block the props. It saves you some HP but it will cost you DPS.
Strat#2 – Top right safe spot
Score Potential: A
Consistency: Good luck
There’s a special spot you can drag your team to using Fuuka’s curry pot or any other repositional ability. It’s on the top right side of the map:

Thx Noxy for image
Once your team is up here, you can dodge almost all combinations of Kuro’s attacks. This allows you to bring bigger DPS options without worrying for their HP. Supposedly quite difficult to pull it off though, so get ready to grind your teeth a bit.
Worth noting that Asuna and Izuna can do this independently. So if you have those two in your team for P2 you should drag them up there for safe damage.
Strat#3 – Alice hiding spot
Score Potential: C
Consistency: A
You really shouldn’t be using Alice in raids, but if you’re just throwing bodies at Kuro anyway then you should put Alice in Position 4. This makes her stand in the corner of the map where she can only be hit by one possible attack combination of Kuro’s. Beware that you may need to use her Ex at least once to push her back slightly, costing you DPS you could have had elsewhere.

Strat#4 – S. Mashiro stall
Score Potential: C
Consistency: A
Basically sending only a single tank + S.Mashiro at Kuro, with any other unit for SP regen, so that you can spam S.Mash EX for 4 minutes.
It might be viable if you happen to have an EX5 S.Mash sitting around… and you have a spare tank… and you can’t fit S.Mash into any other team… and the light at the end of the tunnel is just barely out of reach… but even with all those conditions it’s not actually recommended to do this unless you’re sure of what you are doing. Either way, I’m documenting it here so you can think about it.

Example Runs
Shirokuro Extreme
13,811,836 score, 1 team, Indoors clear by Adipose9 : Blue Archive – ShiroKuro Raid – 1 Team Clear – Extreme – Indoor – 13,811,836
Shirokuro Hardcore
7,384,212 score, 1 team, Indoors clear by Toir :
7,438,399 score, 1 team, Urban clear by Johny:
ブルーアーカイブ / ブルアカ – 総力戦 シロ&クロ・市街地戦 HC 1 Turn (模擬) (7438) (2021-08)
Hieronymus

Amour Type: Light
Hieronymus Extreme
HP: 6.000.000
Phase 1
Phase 1 and Phase 2 of Hiero are more or less the same. There are no complex or unique strategies. Hieronymus is purely a team building challenge with one question in mind: How can you sustain DPS and HPS at the same time?
This means you can not throw bodies at him and expect to clear.
Since ideas throughout the raid are the same, there will be only one team building section and no “strategy” section after the basics of each phase are briefed.
Basic Info
Main Mechanic: Green Totem
A green totem sits on the field. When this totem is healed to full HP, it will apply a 55% damage taken debuff to Heironymus, stacking up to 5 times. This is extremely important, because if you do not engage with this mechanic your DPS will be close to nil. You don’t always need to stack to 5, but you must start stacking as soon as you possibly can. Debuff count does NOT transfer between teams. All of this means you must have at least one healer in every team.

After you’ve healed the green totem to full and the totem has applied the debuff, the totem will temporarily receive a healing reduction of 50%. This healing reduction will disappear after about 20 seconds. If you heal the totem to full while the debuff is active, it will still apply the next stack to Hiero – it’s just not recommended to do so because 50% reduction isn’t easy to get over. After all, this totem has 15k HP in Hardcore, and 35k HP on Extreme. The totem disappears after applying all 5 stacks.
Skill 1: Time Bomb

Heiro curses a student, indicated by a countdown above their head. Once this countdown hits 0 the curse explodes dealing massive damage to the student.
How to deal with this:
- Heal the affected unit to full hp. The curse will be removed.
- There is a chance for the damage to be blocked if the unit is behind cover (?)
Phase 2
Basic Info
Main Mechanic 2: Red Totem
A red totem sits on the field. When this totem is healed to full HP, Hieronymus’ next attack is cancelled, and you get a slight refund in SP. This totem also gets healing reduction after use.
Skill 2: Party Wipe
When Hiero reaches 3 Skill Bars, he begins to charge up a powerful attack. At the end of the charge, he will deal massive unavoidable damage. This WILL wipe your team, no matter what.
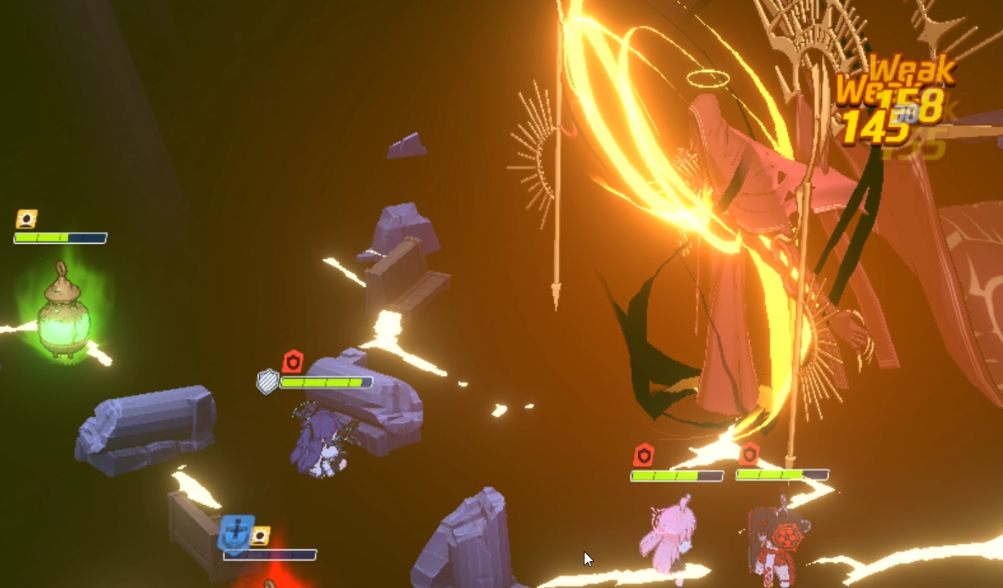
Moments before death
How to deal with this:
- You must use the red totem. Keep an eye on his skill bar and make sure you know when it’s about to hit 3. Once it gets very close keep an eye on his left staff. If the left staff glows red he is about to cast the wipe. You MUST heal the red totem during these moments, because you will not be able to cancel the attack once he actually starts casting.
- If you miss the timing you can always force-close the app to restart :^)

GIF version:
General Team Building
Because Phase 1 and 2 are basically the same, the chart will generalise for both phases:

Your teams will typically consist of:
- 1 or 2 Auto Attackers. You will not use these unit’s Ex skills.
- One tank
- At least 2 DPS units you will use Ex with.
- One strong single target healer
- Optionally one AOE healer
- If you have enough healing, you can choose to have damage dealing/buffing special
Unit considerations
Before you read this section, know that solo Serina is enough for hardcore and below. Aim for 2 Star, Lv70, Ex3, Passive 7 Serina.
Chinatsu
One of two units who can one shot heal the lantern on Extreme, but requires a hefty investment. Table below shows the skill thresholds required for:
- Lv70, 5 Star, Tier 5, Bond 11

4 Star Chinatsu can also pull it off, but she must be Ex5 (with any level of passive).
3 Star Chinatsu can also pull it off, but she must be Ex5 with at least lv7 passive.
Hanae
The other unit who can one shot heal the lantern on Extreme, but occurs over time. This overtime nature of her heal is not ideal for stacking the green totem as fast as possible but she requires a much lower level of investment. Table below shows the skill thresholds for:
- Lv70, 3 Star, Tier 5, Bond 11

While Ex3 passive 1 is enough, you probably want a few levels in her passive because Hiero can attack the totem mid heal and ruin your day. Source for tables
Serina + Koharu
Two units who both have passive healing allowing them to tag team heal with little effort. The go-to combo for high rankers because of their low cost high output potential – at the expense of micro management and RNG dancing.
We don’t have exact numbers for the investment they require, but we know it will be very smooth sailing if you have
- Lv70, 3 Star, Ex3, Normal10 Koharu
- Lv70, 3 Star, Ex4, Passive10 Serina
You’ll still do fine if these units are weaker in some areas or stronger in another compared to the points above.
Hibiki
(and other multi-AOE)
Hiero’s hitbox is quite generous (no, his cape is not a hitbox), allowing Hibiki to hit all 5 of her mortars during her Ex. Definitely a highly desirable unit for this raid.
Just aim for his feet, you don’t need to be too precise.

Thx ktshiri for image
Example Runs
Hiero Extreme
13,813,330 score, 1 team, Urban clear by Adipose9:
Blue Archive Extreme Hiero Raid – One Team Clear
12,332,157 score, 2 teams, Urban clear by Toir:
【ブルーアーカイブ】 ヒエロニムス EX 2凸「1233万」
Hiero Hardcore
7,364,266 score, 1 team, Indoors clear by Toir:
7,266,025 score, 1 team, Indoors clear by Stokesia:
[Blue Archive] Am i playing Arknights? – Hieronymus Hardcore 7266025pts
7,042,345 score, 1 team, Indoors clear by Johny:
ブルアカ – 総力戦 ヒエロニムス HC 1 Turn (模擬)
Chesed

Amour Type: Heavy
Chesed Extreme
HP: 3.400.000
Phase 1
Pure Mobbing. Nothing to say here besides bring your best mobbers… but don’t bring too many, because you will still need some for Phase 2. The challenge in Chesed is balancing your single target damage vs your AOE damage between teams without losing any fire power.
No complicated strategies or info for Phase 1, just kill the mobs to your best ability.
General Team Building

Iori is more important in P2 than P1, so if you only have access to one you should use her later.
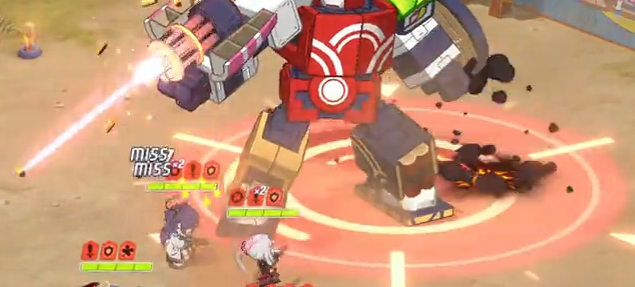
Phase 2
The actual boss, but it will continue to summon mobs. Most of the time, Chesed’s Core is hidden behind its chassis. It will open up to expose the core only after clearing 4 waves of mobs. The mobs have a self-destruct attack when you take too long to kill them. If you see this it’s a good indicator you don’t have enough damage.
General Team Building
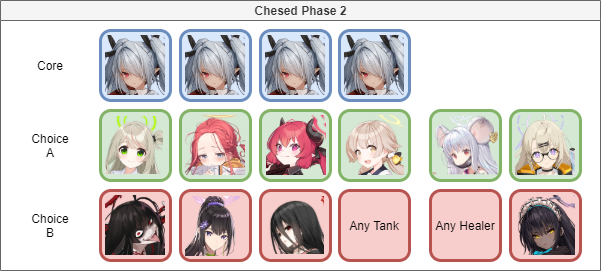
Worth saying that AOE options between phase 1 and 2 are basically interchangeable. You just need to find the right balance for your own roster.
Strategies
Strat#1 – Retire phase 1 team part-way through phase 2
Score Potential: A
Consistency: A
If you’re doing well, you probably made it to Chesed with your first team with about a minute or two to spare. Since your first team is built purely for mobbing, you want to use that advantage in cleaning up the mobs for your second team to get a headstart in single target damage. You do this by having your first team kill 3 and a half waves, then retiring. When your second team loads in they will only need to kill half of one wave, after which they can unload all their damage into the boss.
Example Runs
Chesed Extreme
13,468,796 score, 2 teams, Outdoors clear by Adipose9 :
Blue Archive Chesed Extreme 2 Team – 13,468,796
13,037,008 score, 2 teams, Outdoors clear by Johny
ブルーアーカイブ / ブルアカ – 総力戦 屋外戦・ケセド EX 2 PT (130) (模擬)
12,297,810 score, 2 teams, Outdoors clear by Toir:
Chesed Hardcore
7,254,505 score, 1 team, Indoors clear by Stokesia :
[Blue Archive] Chesed Raid Hardcore – 7254505 points
7,222,800 score, 1 team, Outdoors clear by Stokesia :
[Blue Archive] Outdoor Chesed Hardcore 72228 pts
Binah

Amour Type: Heavy
Binah Extreme
HP: 6.000.000
Defense: Too many
All phases
The ultimate “kill it until it dies” boss. There’s nothing for you to interact with, and there are no mechanics you can outplay* or strategise around; You can only pray they won’t happen. Just one big metal snake for you to shoot. Easier said than done, but nonetheless this boss will have the smallest section, which will include only a simple team building chart.
*Technically you can use Peroro-sama and Turrets to mitigate some missile damage, but this tidbit doesn’t deserve its own section
General Team Building
Seriously, just shoot it. At the very least, you want to have defense downs on each team. You may want to consider a tank + healer if you’re dying. Refer to Stok’s sheet for unit info.

Example Runs
Binah Extreme
9,996,371 score, 4 teams, Outdoors clear by Johny
ブルアカ – 総力戦 ビナー・屋外戦 EX 4 Turn (模擬) (9996371)
Binah Hardcore
6,975,466 score, 1 team, Outdoors clear by Johny
Definitelynotintokids
Wednesday 15th of December 2021
This is amazing